How can I improve performance on The Outer Worlds 2?
If you're experiencing performance issues with The Outer Worlds 2, please try the following things:
1. Verify Your PC Specs
First, let's verify your system meets the game's minimum requirements. If your hardware falls below these standards, you may experience sluggish performance or more severe issues while playing.
The Outer Worlds 2 System Requirements
If your hardware meets or exceeds our system requirements, let's continue to the next suggestions.
2. Update Your Graphics Drivers
If your system meets the game’s minimum requirements, we recommend updating your graphics card drivers to the latest version.
If you’re still experiencing issues that may be graphics-related, try updating your drivers again, this time using the “clean install” option (if available, depending on the manufacturer). This ensures old driver files are removed, preventing potential conflicts.
Finally, restart your PC after installing new drivers before starting the game again.
3. Close Background Applications
If you're running any other applications, including and especially any browser windows full of open tabs (we've all been there!), they can contribute to slowdowns or hitching. Closing these applications can help to free up RAM and CPU headroom while playing the game.
4. In-Game Settings
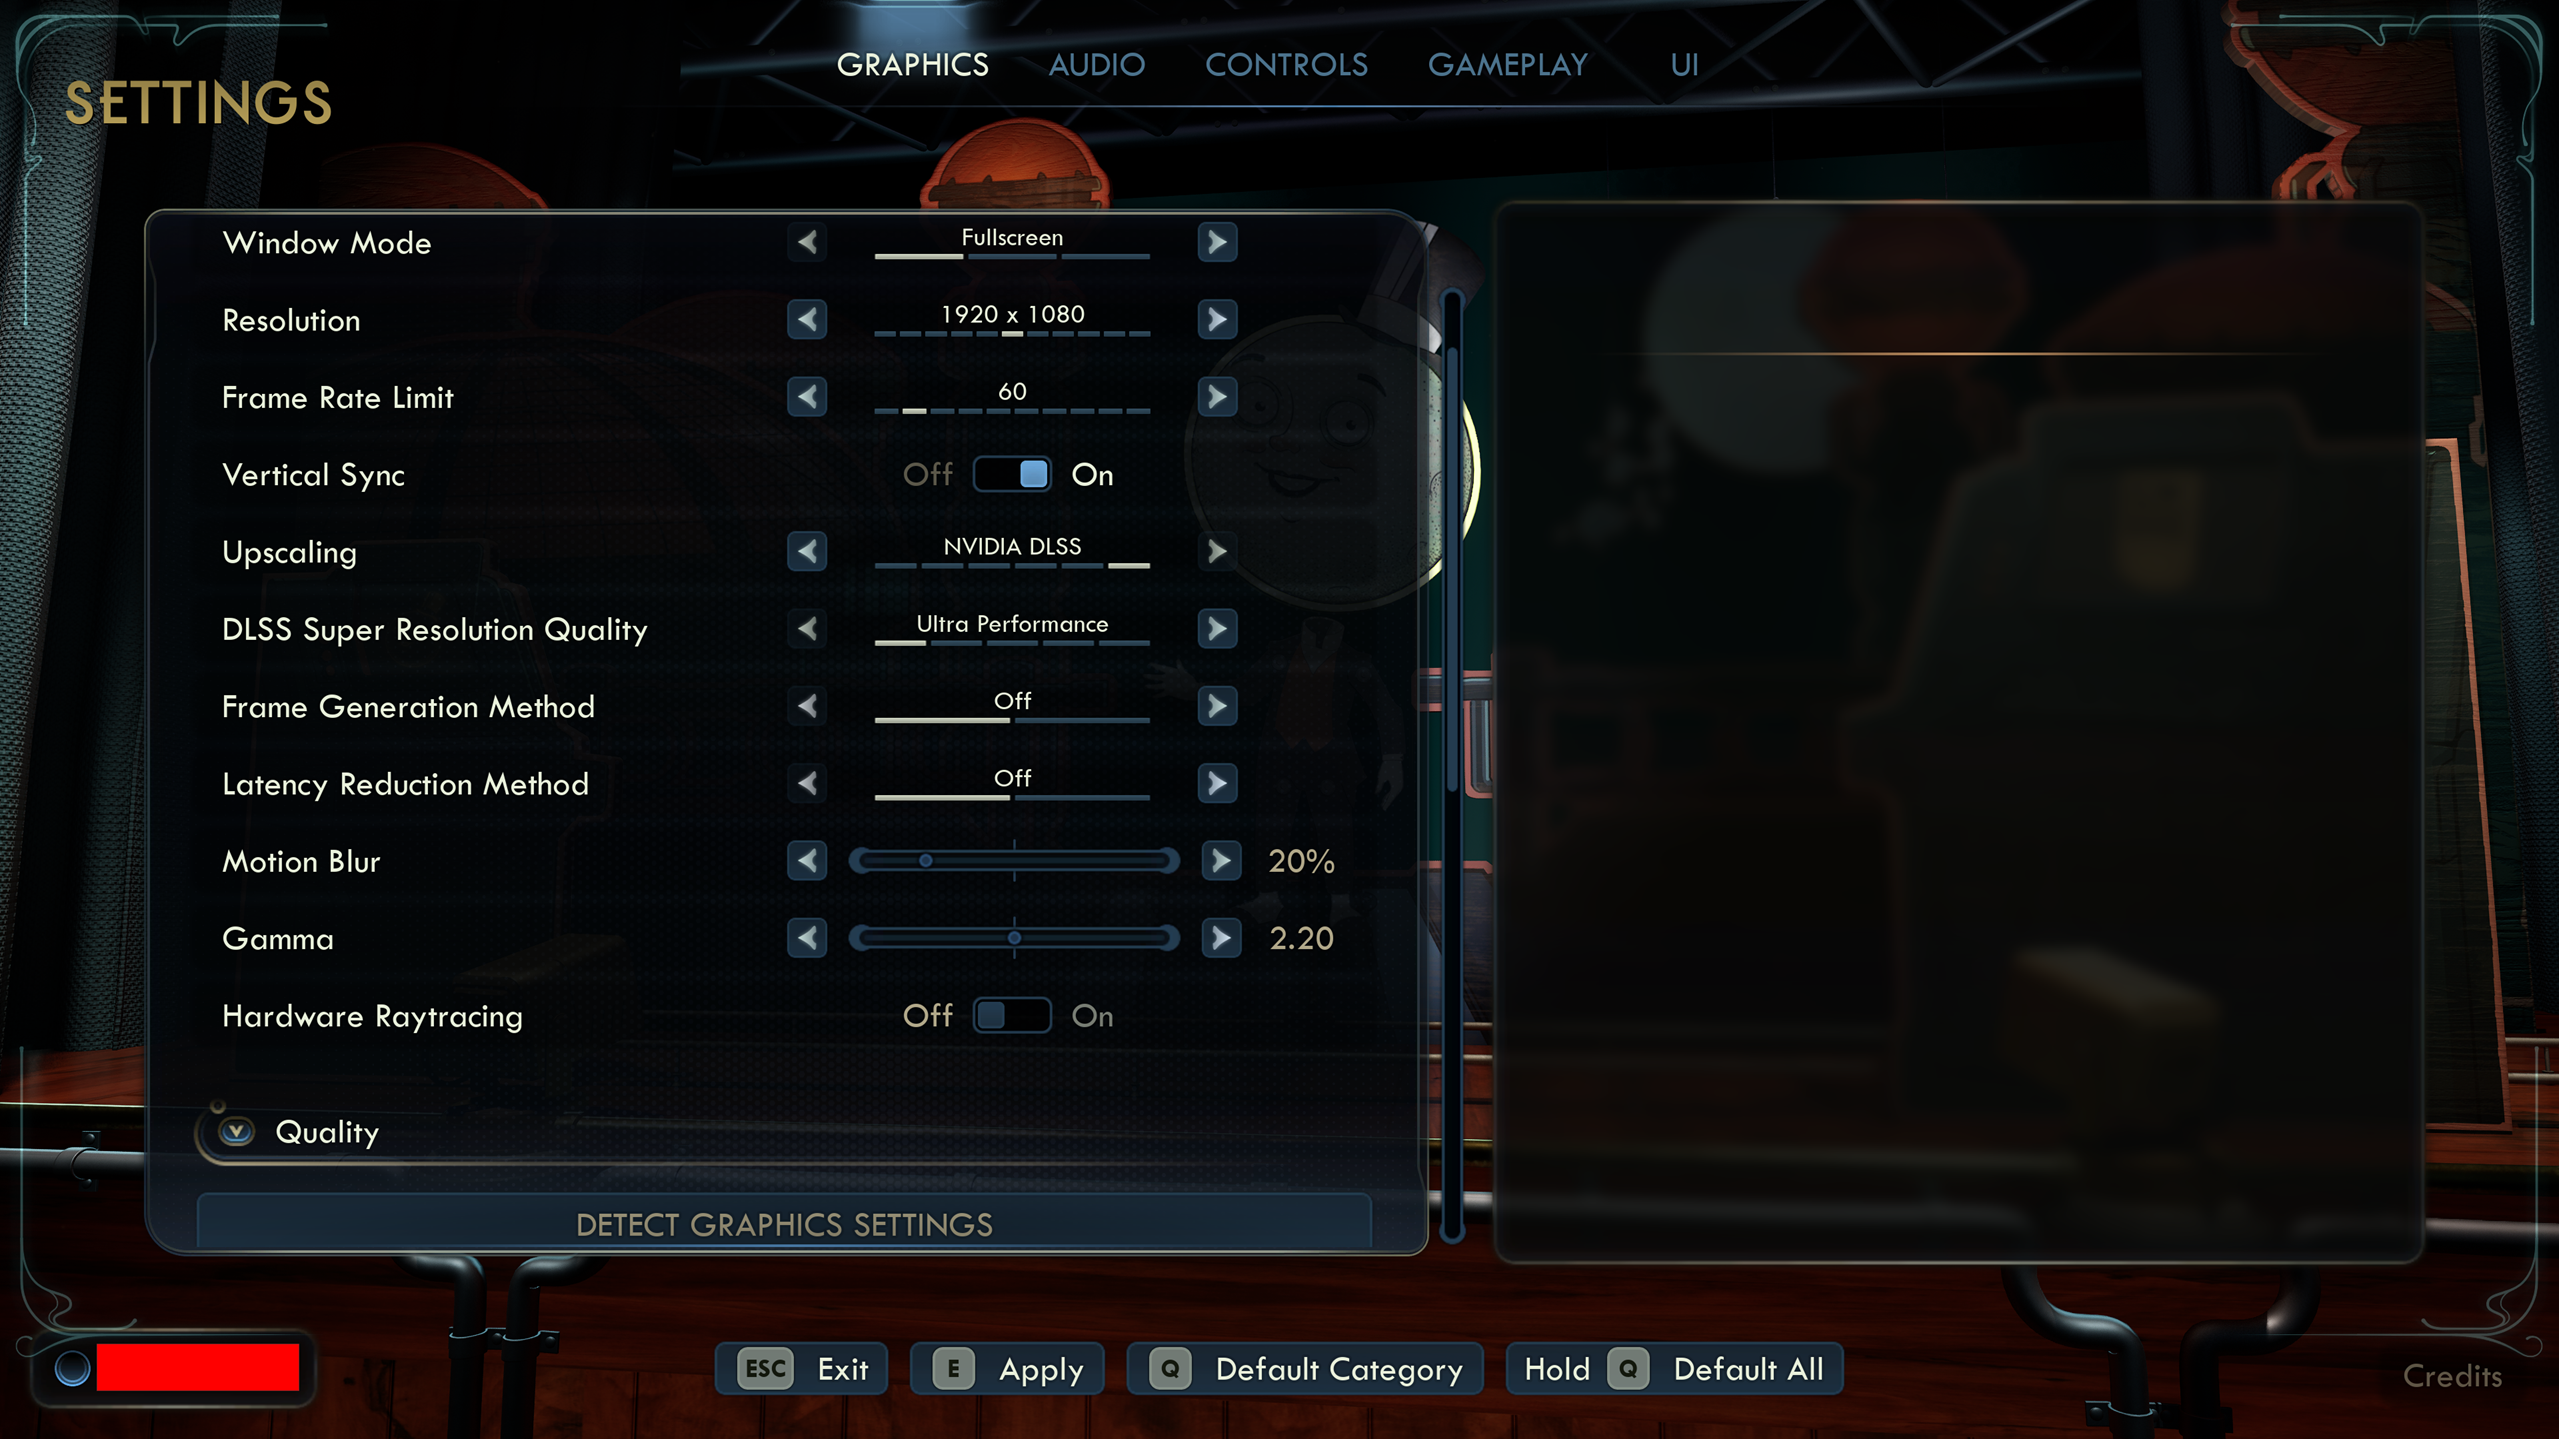
Try the following options one at a time in order and stop once performance feels smoother or more consistent. Each step can improve framerate or stability, often with little visual sacrifice.
Upscaling / Super Resolution
Upscalers draw the game at a lower internal resolution and use advanced techniques to enlarge the image and keep it looking sharp, which can give some nice FPS gains.
What to Try:
Enable an upscaling method your graphics card supports. Temporal Super Resolution (TSR) is a good general default, but manufacturer-specific options may improve performance and quality. Lower the Resolution Quality slider to the left to increase performance.
Options:
- NVIDIA DLSS – For RTX graphics cards, try setting DLSS Super Resolution Quality setting to Performance or Ultra Performance.
- AMD FidelityFX (FSR 4) – Works on most graphics cards even non-AMD cards. Try setting FSR Super Resolution Quality to Performance or Ultra Performance.
- Intel XeSS – For Intel Arc graphics cards, try setting XeSS Super Resolution Quality to Performance or Ultra Performance.
- Temporal Super Resolution (TSR) – The default option. Try Performance, and if TSR performance still isn’t enough, try using AMD FidelityFX and test again.
Tip: Keep your Resolution set to your monitor’s native/maximum value; the upscaler handles scaling automatically.
Advanced Note: In general, use the upscaler that matches your GPU brand (DLSS for NVIDIA, FSR for AMD, XeSS for Intel) for best image quality and stability. Most options work on any cards but may offer different visual results.
Resolution
Fewer pixels drawn means less work for your graphics card, so dropping resolution can give FPS boosts with a small hit to image sharpness.
What to Try:
If you prefer to play the game using the Fullscreen option, lowering the resolution can help. We recommend trying the Upscaling feature first, but this option is also available if you prefer.
Hardware Raytracing
Raytracing offers realistic lighting and shadows, but it can be demanding on both GPU and CPU. In some areas it may actually improve performance, as raytraced shadows can be more efficient than traditional ones, but results will vary by hardware and how complex the scene is.
What to Try:
Toggle Hardware Raytracing On or Off and test performance both ways. (It’s Off by default)
Advanced Note: If your GPU load is low but the CPU is pegged (high CPU usage, low GPU usage in Windows Task Manager), turning off CPU-heavy settings like Raytracing and Crowd Density can sometimes help.
Graphics Quality Presets
Each preset changes several features (shadows, effects, lighting, foliage) that can heavily affect performance.
What to Try:
Lower the Graphics Quality preset one step at a time – for example, from Very High → High → Medium – and retest.
Tip:
If you want finer control, choose Custom and lower these first:
- Shadows – Shadows are computationally expensive and lowering their quality alone can improve performance
- Reflections – Reflections are also computationally expensive but aren’t always as noticeable as shadows. Lowering this can help.
- Global Illumination – Lowering this can help reduce the load on the graphics card when simulating how light bounces on surfaces in the world
- Foliage – Lower if dense vegetation areas feel slow (e.g. in Paradise Island)
- View Distance – Reducing the view distance means fewer items for the game to have to process during the current frame
- Visual Effects – Effects like explosions or weapon trails can be demanding during big fights. Lower this helps when a lot is happening on screen.
- Textures – Lowering the quality of textures can help reduce the load on your graphics card, especially if you have an older card or one without 12+ GB of memory
- Crowd Density – If you notice sluggishness in populated areas in the game, you can try reducing the quality setting here to improve performance
Frame Rate Limit and V-Sync
A frame cap prevents your GPU from overworking and stabilizes frame pacing. V-Sync smooths tearing but can slightly increase input latency.
What to Try:
- Set your Frame Rate Limit near your monitor’s refresh rate if you know it (60Hz → 60 FPS, 144 Hz →144, etc.).
- Keep V-Sync On (default) if you see screen tearing. Turn it Off if you prefer the lowest input delay.
Tips:
- If stuttering appears with V-Sync On, try turning it Off or use Adaptive V-Sync in your GPU control panel.
- If your monitor supports G-Sync or FreeSync, leave V-Sync Off and let your monitor handle tear-free syncing automatically
Advanced Note:
If you enable Frame Generation, you may need to disable your frame-rate cap – otherwise the game may generate too few base frames and feel more sluggish.
Frame Generation and Latency Reduction
Frame Generation can boost perceived framerate by inserting AI-generated frames, and Latency Reduction offsets the extra delay.
What to Try:
Turn Frame Generation and Latency Reduction to On if your hardware supports them (NVIDIA RTX 40-series, AMD RX 7000, and Intel Arc graphics cards). Also, see the in-game help notes for important information.
Tips:
- Only enable Frame Generation if your framerate is already above roughly 45 FPS; at lower framerates, it can feel more sluggish.
- Keep both options On together for the best balance of smoothness and responsiveness.
- Set Frame Rate Limit to Unlimited when using this feature.
Motion Blur
Set Motion Blur to 0% for a sharper image during fast movement, though it may look less cinematic.
Field of View (FOV)
Keep FOV near the default (90) or slightly lower it for small performance gains.
Higher FOVs show more of the world, which increases the amount of work your graphics card needs to do.
Other Tips
- Install the game on your fastest drive for best loading and streaming performance. M.2 NVMe drives (Gen 4 or 5) offer the best experience, followed by SATA SSDs. We don’t recommend playing on a mechanical hard drive. You can use tools such as CrystalDiskMark to test performance to determine the fastest drive.
- Make sure there is at least 10-20 GB of free disk space on the drive the game is installed.
- Changing the Power Plan in Windows to High Performance, especially on plugged-in laptops, can improve CPU performance.
- Overlays (Steam, Discord, NVIDIA/AMD driver overlays, ShadowPlay, et al.) can sometimes interfere with frame-timing or introduce micro-stutters. Try disabling them to see if that improves things.